
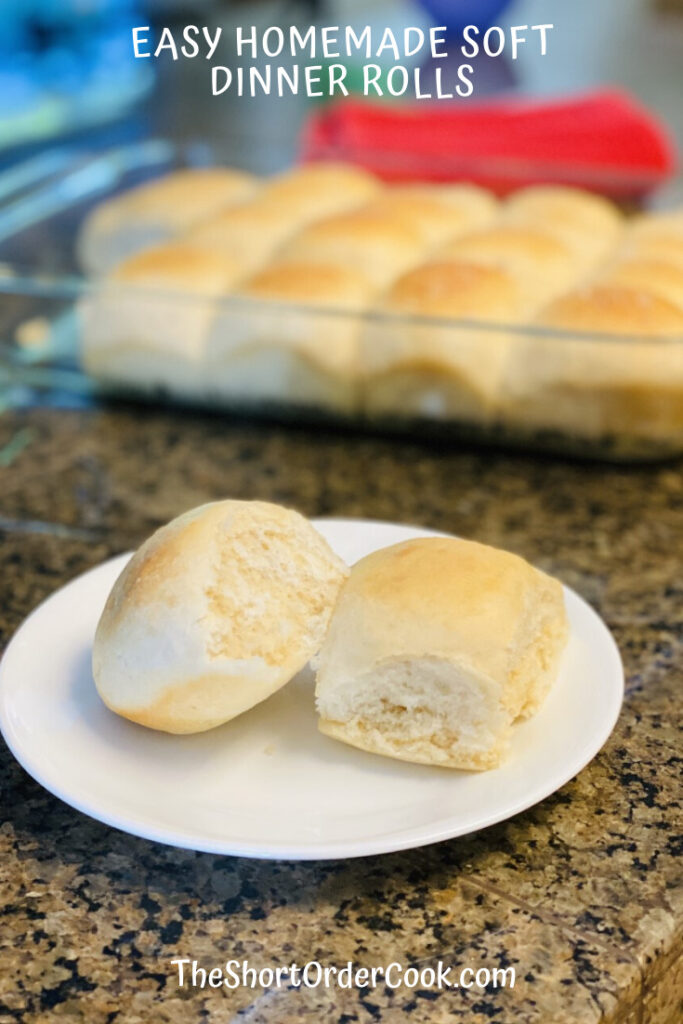
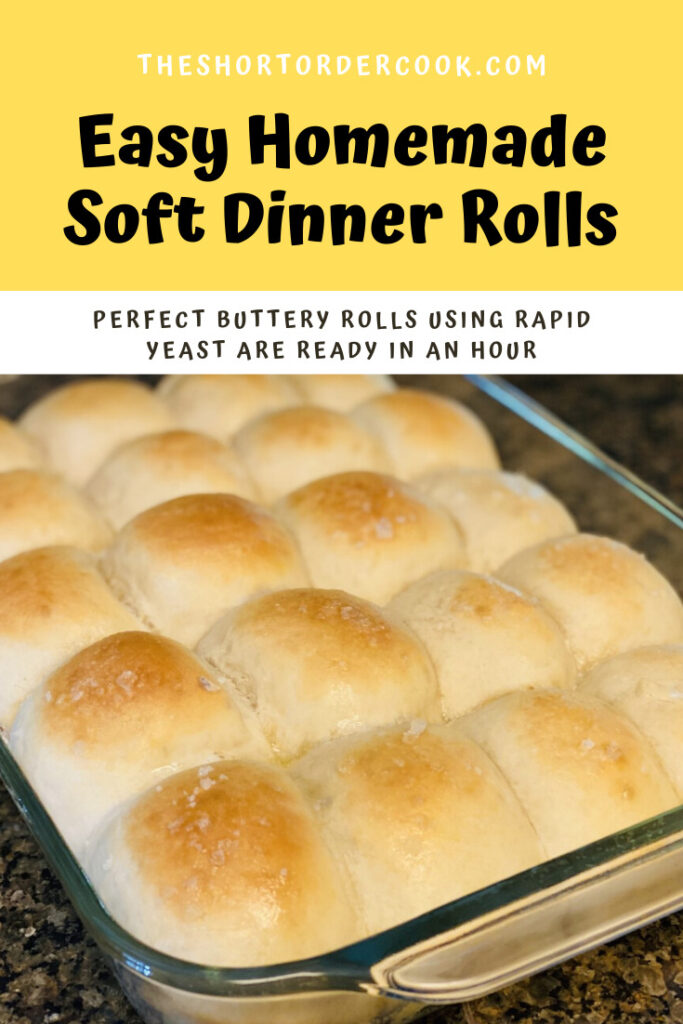
The best soft homemade dinner rolls recipe using yeast are easy to make and a family favorite. Making these from scratch results in super soft, buttery, and the most delicious bread you have ever had. And the amazing part about this fast recipe is it is ready in about an hour.
Yes, homemade soft dinner rolls in an hour. They are enjoyed best when warm straight out of the oven. Their buttery tops are slightly brown with a pinch of sea salt and the insides are fluffy and tender. Just add fresh butter for melt-in-your-mouth perfection. These quick dinner rolls are great to make for holidays and other gatherings but so simple to make that you can enjoy it any day of the year.
What to Serve with Dinner Rolls
Fresh-baked dinner rolls are a must at our Thanksgiving table every year. But to be honest, having freshly baked bread at any meal is a wonderful dinner side dish. That is what makes this recipe so versatile and loved. Here are some great ideas on how to enjoy the dinner rolls once you made them. You may want to make a double batch if you want leftovers to enjoy with some of these great recipes or meal ideas:
- Holiday side dish, Including with best HOW TO DRY BRINE A TURKEY
- Along with your favorite soup like EASY SLOW COOKER BUTTERNUT SQUASH SOUP
- Sliders - add lunch meat, cheese, and condiments for mini sandwiches.
- Breakfast Sandwich - add scrambled eggs and a sausage patty for a quick morning bite that will keep you going
- Mini-Burger Sliders - meat patty, cheese, pickle, mustard, and ketchup yum!
- Spread SOUTHERN PIMENTO CHEESE inside for a fun appetizer
Making Homemade Dinner Rolls
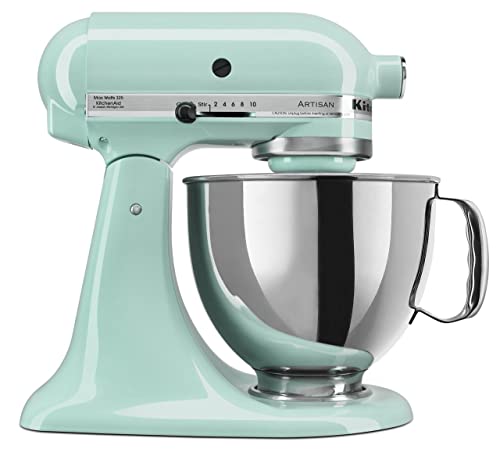
There are only a few steps and a quick rise for this recipe. You will need a stand mixer so that the dough is mixed and kneaded easily. You can still make this if you do not have this item but note that it will take longer and be a bit more work.
Prepare the Dough
In your stand mixer, you will prepare the dough by adding yeast to warm water (105-115°) with a bit of sugar. Let that dissolve and activate for about 5 minutes. Next, you will add the other ingredients and mix well with the paddle attachment. Lastly, the dough hook goes on to knead the dough a final few minutes. The dough will then need to rise in a warm place for 20 minutes before it is time to make the dough balls.
- If you do not have a stand mixer, you can do this all by hand. You can use a large curved rubber spatula to combine all the ingredients with the dissolved yeast mixture. Be sure to fold and bring in all the ingredients from the outer edge of the bowl to the center. This helps combine evenly so there are no dry or too wet spots in the dough. Once it is combined, put the dough out on a lightly floured work surface and hand-knead the dough about 10 minutes. Do so by pulling and pushing with your hands as described best by Bon Appetit magazine in this comprehensive article - HOW TO KNEAD DOUGH LIKE YOU ARE IN CHARGE.
Rolling Out the Dough Balls
Prepare a large baking casserole dish with non-stick spray or covered in butter. I used a 13x9x2 dish. Roll each of the 20 pieces into a ball and place them in the prepared pan. 20 should fit into this pan size with room in between each. This is perfect as they will expand as they continue to rise and bake.
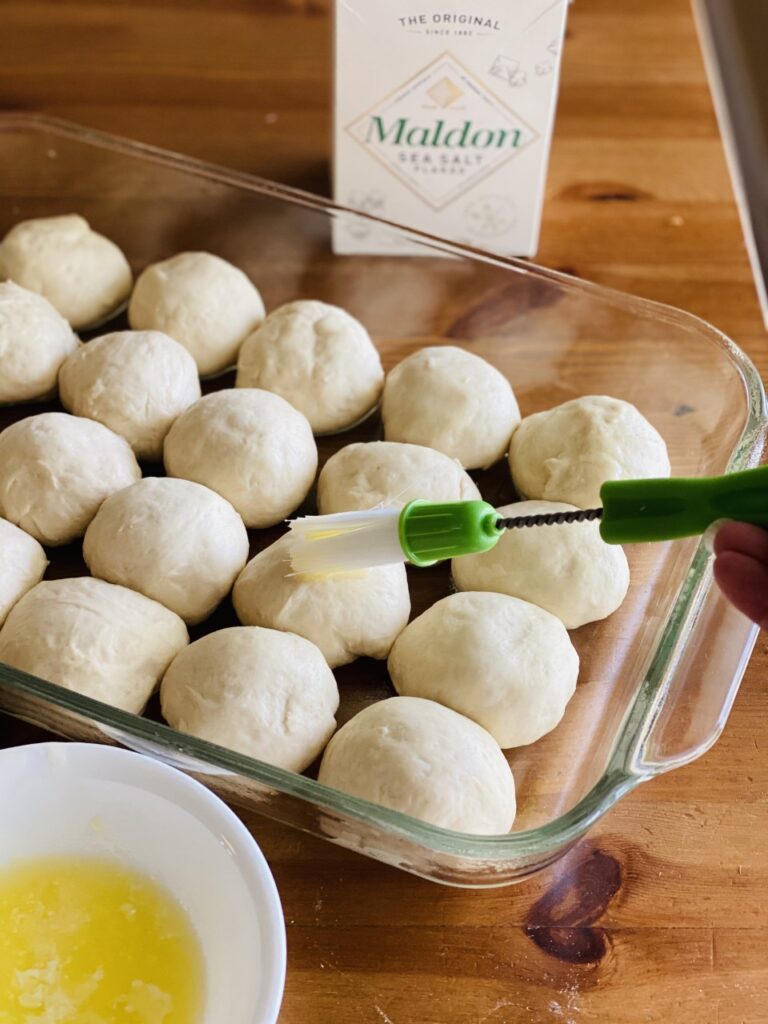
Brush dough balls with melted butter
Brush with half the melted butter and sprinkle on some sea salt flakes. Be sure to cover each roll. Preheat oven to 400°. While the oven is preheating, let the rolls rise another 15 minutes.
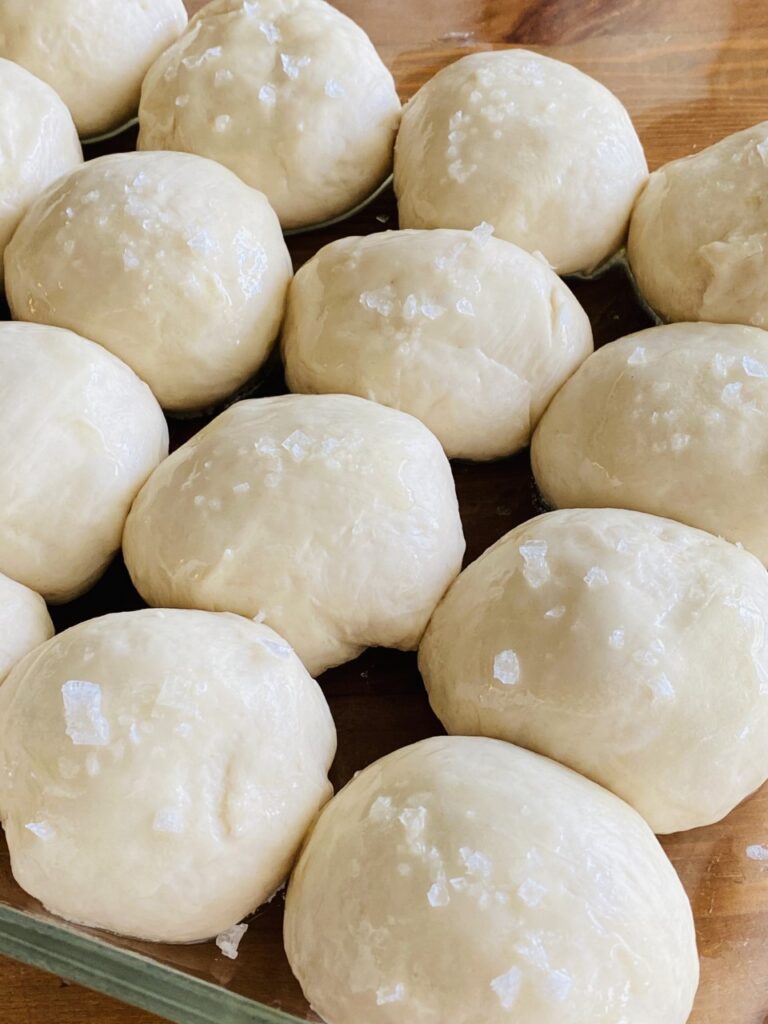
Sprinkle roll balls with flaky sea salt before baking
Bake the Rolls in the Oven
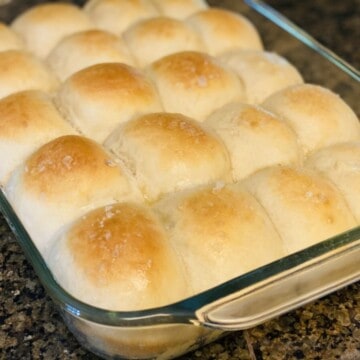
Bake for 15-18 minutes, depending on how golden brown that you like your tops. We like ours on the lighter side so this is how they looked at 15 minutes. After you take them out of the oven, brush with the remaining melted butter.
Let cool about 5 minutes and then they are ready to enjoy! These will be gobbled up pretty quickly as they smell amazing while they bake that everyone in the house will be ready to eat one as soon as they are safe.
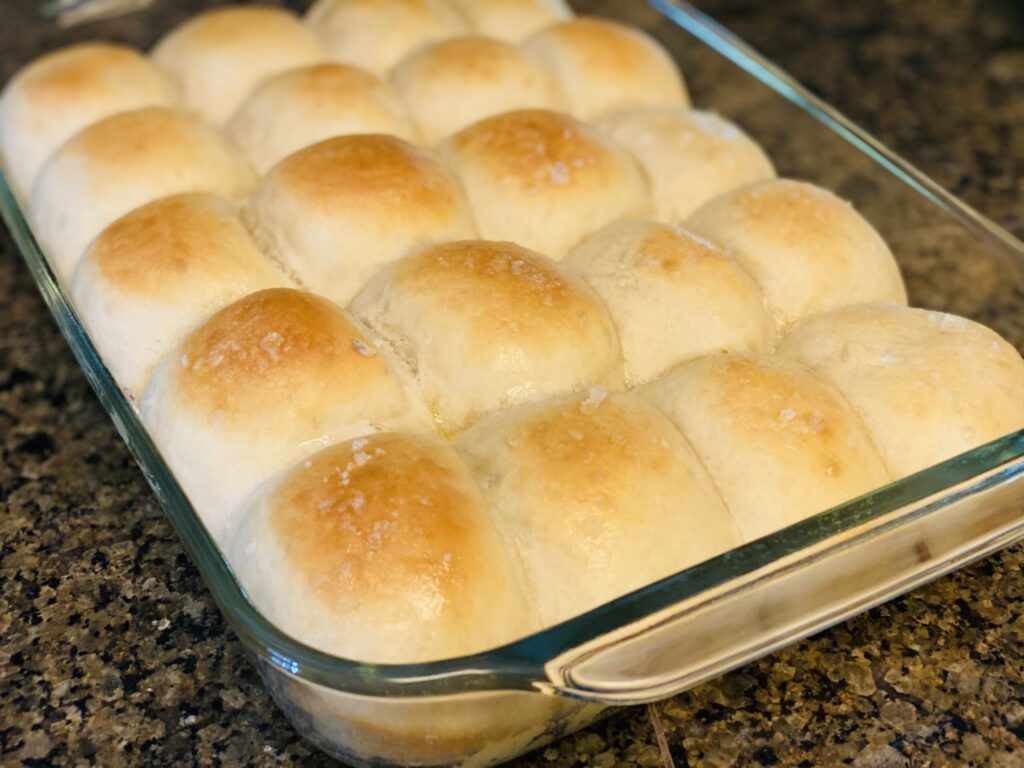
Freshly baked easy homemade soft dinner rolls
Warm and ready to enjoy!
PIN FOR SAFEKEEPING & SHARING!
Easy Homemade Soft Dinner Rolls PIN
Product Recommendations for this Recipe:


The Short Order Cook is a participant in the Amazon Services LLC Associates Program. As an Amazon Associate, I earn from qualifying purchases. If you click on a link and make a purchase, I may earn a small commission on the sale at no additional cost to you. This helps with the costs of running the blog. Thank you!
Easy Homemade Soft Dinner Rolls
Equipment
- Stand Mixer, with dough hook and paddle
Ingredients
- 1.5 C warm water between 105-115°
- 1 TB yeast active instant
- 1 TB sugar
- 3 & ¾ C all-purpose flour
- 2 TB salted butter softened
- 1 teaspoon salt
- 4 TB salted butter melted (for brushing on the tops)
- 1 TB flakey sea salt (for sprinkling on the tops)
Instructions
- In your mixing bowl for your stand mixer, add the warm water and sprinkle in the yeast. Add the sugar and stir with a spoon to dissolve. Let sit about 5 minutes for the yeast to start to activate.
- Place the paddle mixing attachment on your stand mixer. Add 2 cups of the flour, the softened butter, and the salt. Turn on the mixer on low and then medium to combine. Stop and add the remaining flour and scrape the sides if needed with a rubber spatula to ensure the dough stays together and combines evenly.
- The dough should not stick to the edges of the bowl and be combined when it is ready to knead. Remove the dough from the paddle and switch to the dough hook attachment. Turn on medium and let the dough hook knead the dough about 4 minutes. The dough should be smooth and a bit elastic when this step is done.
- Remove the mixing bowl from the stand mixer. Cover with plastic wrap and let rise in a warm place for 20 minutes. Inside the oven with only the light on or on top of the refrigerator is what works best for me.
- Remove the plastic wrap and punch down the dough in the bowl. Pull the dough into one large ball and place it on a large work surface or cutting board that has been floured lightly. Gently shape into a large rectangle and portion out the dough into 20 equal-sized pieces.
- Prepare a large baking casserole dish with non-stick spray or covered in butter. I used a 13x9x2 dish. Roll each of the 20 pieces into a ball and place them in the prepared pan. 20 should fit into this pan size with room in between each. This is perfect as they will expand as they continue to rise and bake.
- Brush with half the melted butter and sprinkle on some sea salt flakes. Be sure to cover each roll. Preheat oven to 400°. While the oven is preheating, let the rolls rise another 15 minutes.
- Bake for 15-18 minutes, depending on how golden brown that you like your tops. Once out of the oven, brush with the remaining melted butter (you will likely need to melt this again as it will start to set to solid again while this bakes).
- Let cool about 5 minutes so the butter soaks in and they are easier to handle. Once ready to eat serve with butter and enjoy!
Notes
- Store leftovers for up to 3 days in a cool dry place wrapped tightly or in an air-tight container with a lid.
- Reheat in the oven on 375°F for 5 minutes or until warm.
Nutrition
Did you make this The Short Order Cook Recipe?
Tag @theshortordercookblog (Instagram & Facebook) or @shortorder_cook (Twitter).
I would love to see your latest creations and kitchen adventures.
Dee | Grammy's Grid says
Looks good! Thanks so much for linking up with me at my #UnlimitedMonthlyLinkParty 17. Shared.
Annie Mason says
These look so good and it will give me a chance to take out my mother’s KitchenAid mixer (she was a professional baker...a talent that neither me nor my sister inherited LOL) and make these for a special dinner.
Angela says
Yes, a great reason to use the KitchenAid mixer and have some more family food recipes.
Lily says
Love dinner rolls for their versatility and didn't realize they were so easy to make (I usually just buy them at the supermarket). Will try my hand at this one of these days!
Tarun Denniz says
looks great! cant wait to try this out later this week!