
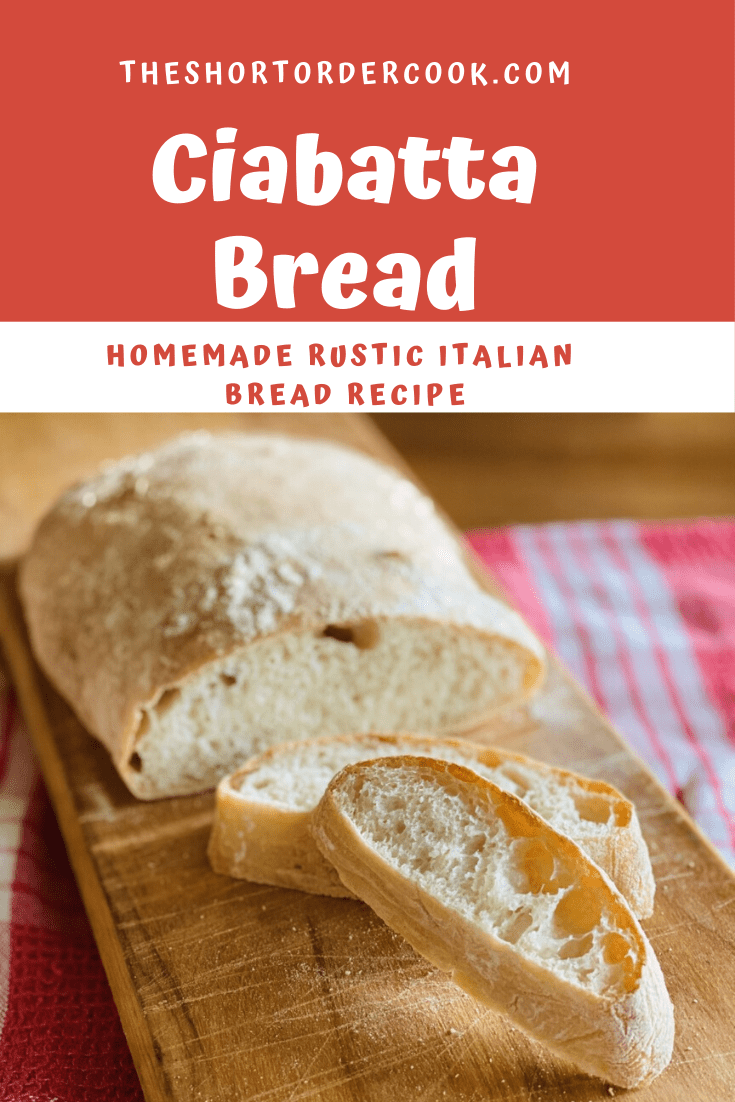
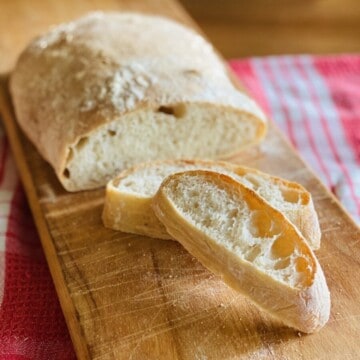
There is something irresistible about a slice of warm rustic homemade ciabatta bread. The delicious crusty bread is tender, airy, and chewy on the inside. It tastes so amazing and learning how to make artisan ciabatta bread is easier than you think.
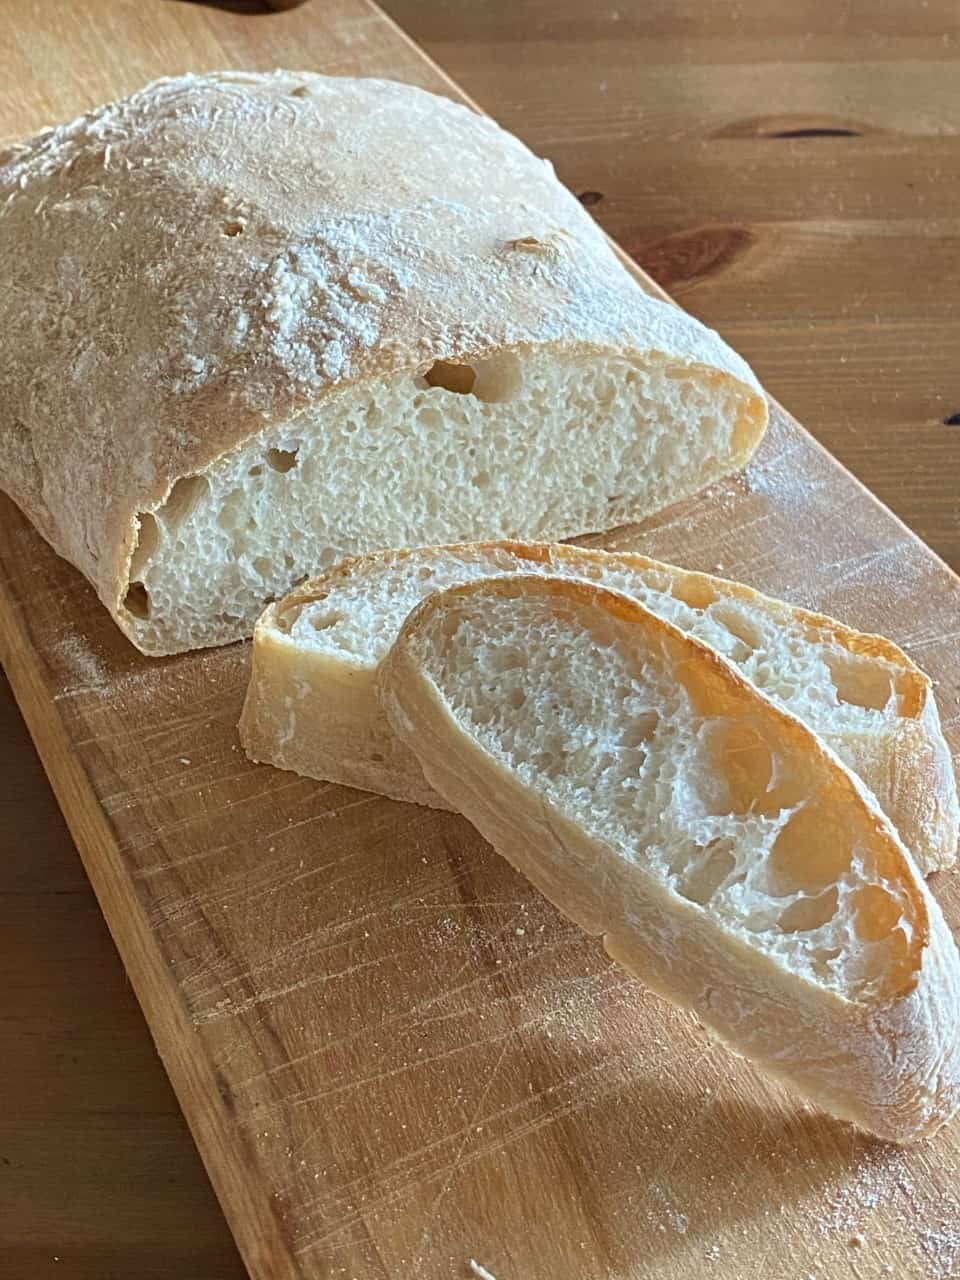
Making homemade authentic ciabatta bread by hand is easier and more delicious than you can imagine. It has distinct irregular holes which make it airy and ideal for sopping up fresh fragrant olive oil or nestling soft butter.
This is my favorite Italian-type bread recipe that pairs well with so many things. We serve it with Pasta al Forno or CrockPot Chicken Cacciatore for a classic Italian meal that is delicious. But our absolute favorite is using it to dip in Italian Marinated Tomatoes or Roasted Cherry Tomato Soup.
Jump to:
- What is Ciabatta?
- FoolProof Artisan Ciabatta Bread Recipe
- Ciabatta Ingredients
- How to Make Ciabatta Bread
- How to Tell if the Dough is Ready
- Storing Ciabatta Bread
- Summary of Steps & Times For Making Ciabatta
- Variations
- What to Serve with Ciabatta
- FAQ
- How to Make Artisan Ciabatta Bread
- More Bread & Roll Recipes
What is Ciabatta?
Ciabatta is an Italian rustic white bread. It was created by a baker in Verona in 1982 to compete with the French baguette. Ciabatta is a short, broad, and elongated version of the baguette. Ciabatta means "slipper" in Italian and the shape mimics that.
FoolProof Artisan Ciabatta Bread Recipe
I tried a few recipes before settling on this being the best one and has worked every time I have made it. If you follow the instructions carefully, the results will be wonderful and impressive. It is not difficult to make this, the steps are simple. It is not quick since it is several steps.
IMPORTANT: Plan ahead when making this recipe. The "sponge" needs to be made about 12-24 hours before you wish to start making this recipe.
The dough is very sticky. It is often called a high-hydration dough ( I won't use the "M" word that several of my friends do not like - haha ). The photos & steps will help you handle this type of dough.
Jump to:
- What is Ciabatta?
- FoolProof Artisan Ciabatta Bread Recipe
- Ciabatta Ingredients
- How to Make Ciabatta Bread
- How to Tell if the Dough is Ready
- Storing Ciabatta Bread
- Summary of Steps & Times For Making Ciabatta
- Variations
- What to Serve with Ciabatta
- FAQ
- How to Make Artisan Ciabatta Bread
- More Bread & Roll Recipes
Ciabatta Ingredients
It only takes 5 simple low-cost ingredients to make ciabatta. Most households have these staples on hand. They are budget-friendly ingredients so making it at home is economical. You can use bread flour but all-purpose flour works out just fine for ciabatta.
Here is what you need to make ciabatta bread at home:
- Yeast - this is the key for making breads rise.
- Flour - all-purpose flour works, nothing fancy here.
- Salt - to flavor the bread.
- Water - to activate the yeast.
- Milk - the protein in milk is creates those important air bubbles (do not omit or substitute!)
How to Make Ciabatta Bread
For most of my recipes, I do not number the steps. However, since this recipe is all about the sequence of steps and timing, to ensure your success, I have numbered them. I have also included timing with each step.
At the end of these steps, is a quick reference timeline so you know how to plan ahead based on when you want to enjoy this amazing homemade rustic ciabatta bread or rolls. These step-by-step instructions will ensure that when making homemade ciabatta at home you will bake the best bread possible.
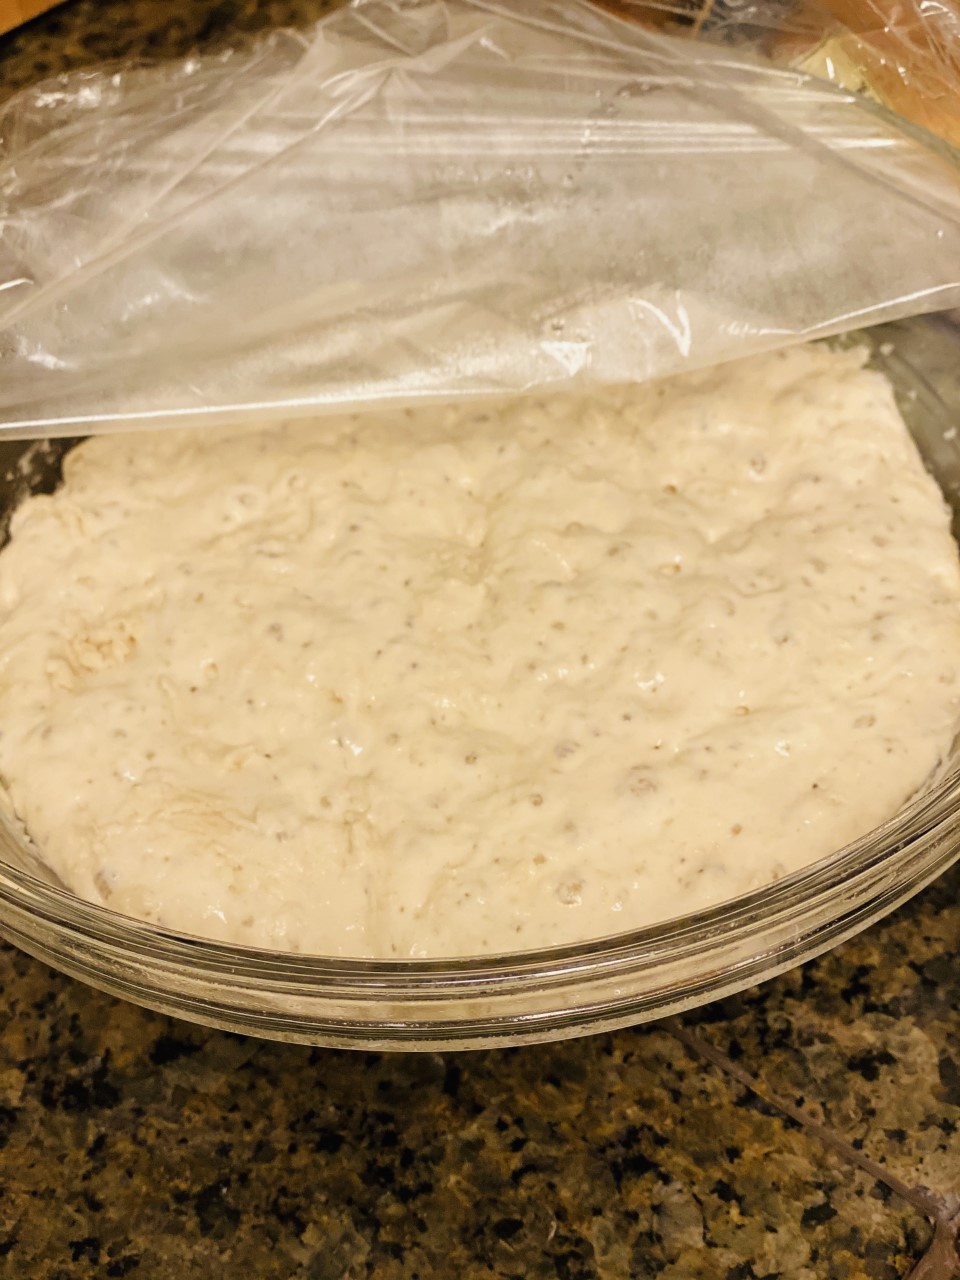
#1 - Make the Sponge (12-24 hour process)
The first step in many bread-making recipes is to make the sponge. This may also be called a biga or poolish. This is how this ciabatta recipe begins too.
To start, combine the cup of flour, ⅛ teaspoon of active dry yeast, and ½ cup of warm water (for a correct yeast activation ensure the water is between 105-110°) in a medium bowl. Stir with a large spoon or rounded rubber spatula until it all comes together. Do not over-mix.
Cover the bowl with plastic wrap. Let the sponge work its magic at room temperature for at least 12 hours or up to 24 hours. If your home is cold, cover it with a light kitchen towel also.
*if you get busy and decide not to use the sponge within 24 hours, you can refrigerate it for up to 3 days. Let it come to room temperature and proceed as follows. Refrigeration allows this to be a make-ahead recipe.
#2 - Make the Dough (15 minutes)
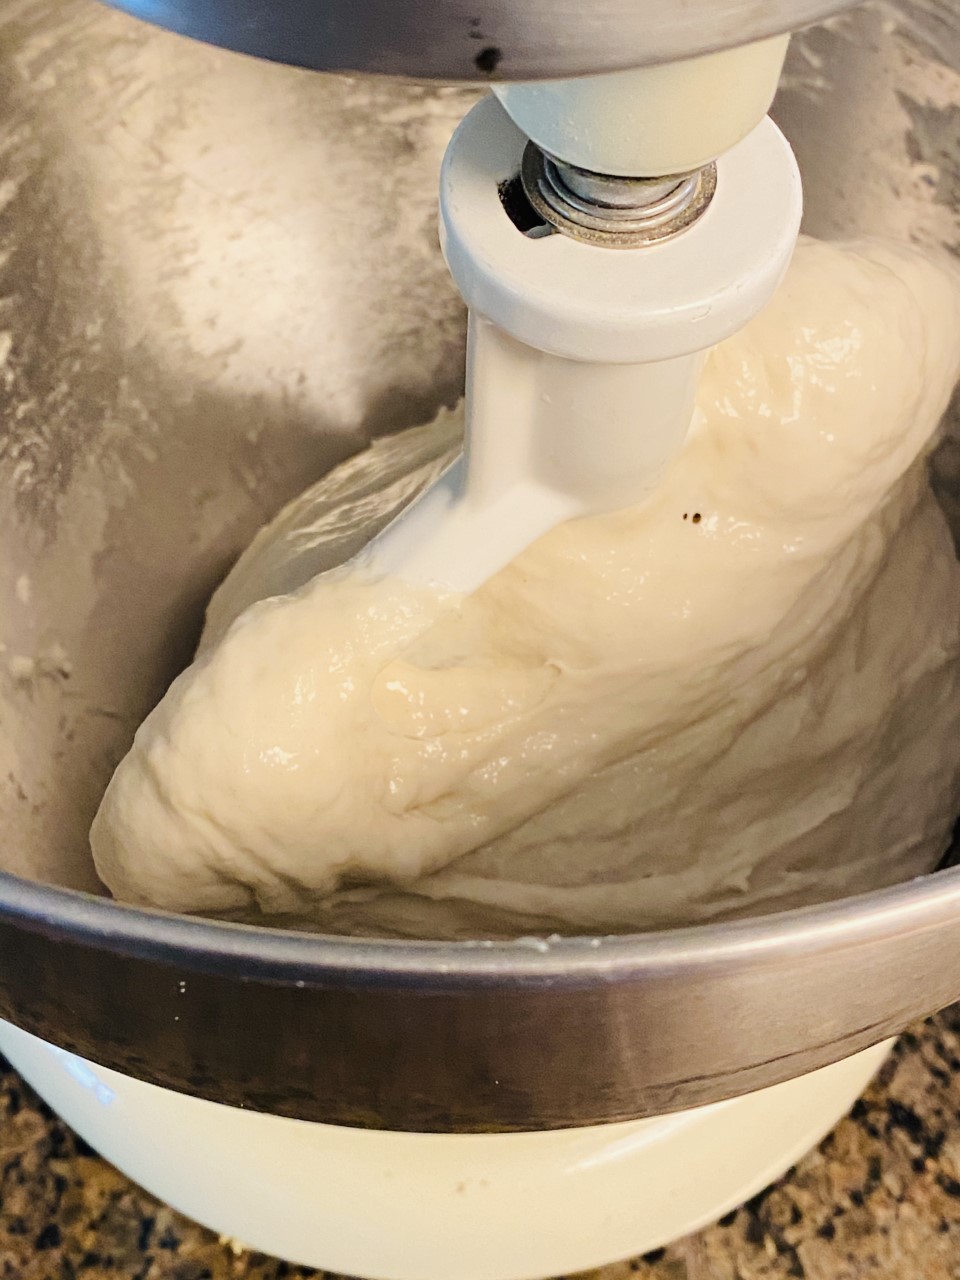
Get out your stand mixer. Scoop out the sponge and put it in the bottom of your stand mixer bowl. Add the remaining ingredients for the dough; 2 cups of flour, 2 teaspoon salt, ½ teaspoon active dry yeast, ¾ cup of warm water (again at 105-110°), and ¼ cup of whole milk. Using the paddle attachment, mix on low speed until combined, about 1 minute.
Scrape down the side with a rubber spatula as needed to ensure the wet and dry ingredients come together. Increase the speed to medium-low and continue mixing until the dough comes together and forms one large sticky dough mass and no longer collects along the sides of the bowl.
It should take about 4 to 6 minutes and look like the two photos below as it comes together. It is a sticky dough but have patience. It will combine and become one large mass.
#3 - Knead & Rest the Dough (70 minutes)
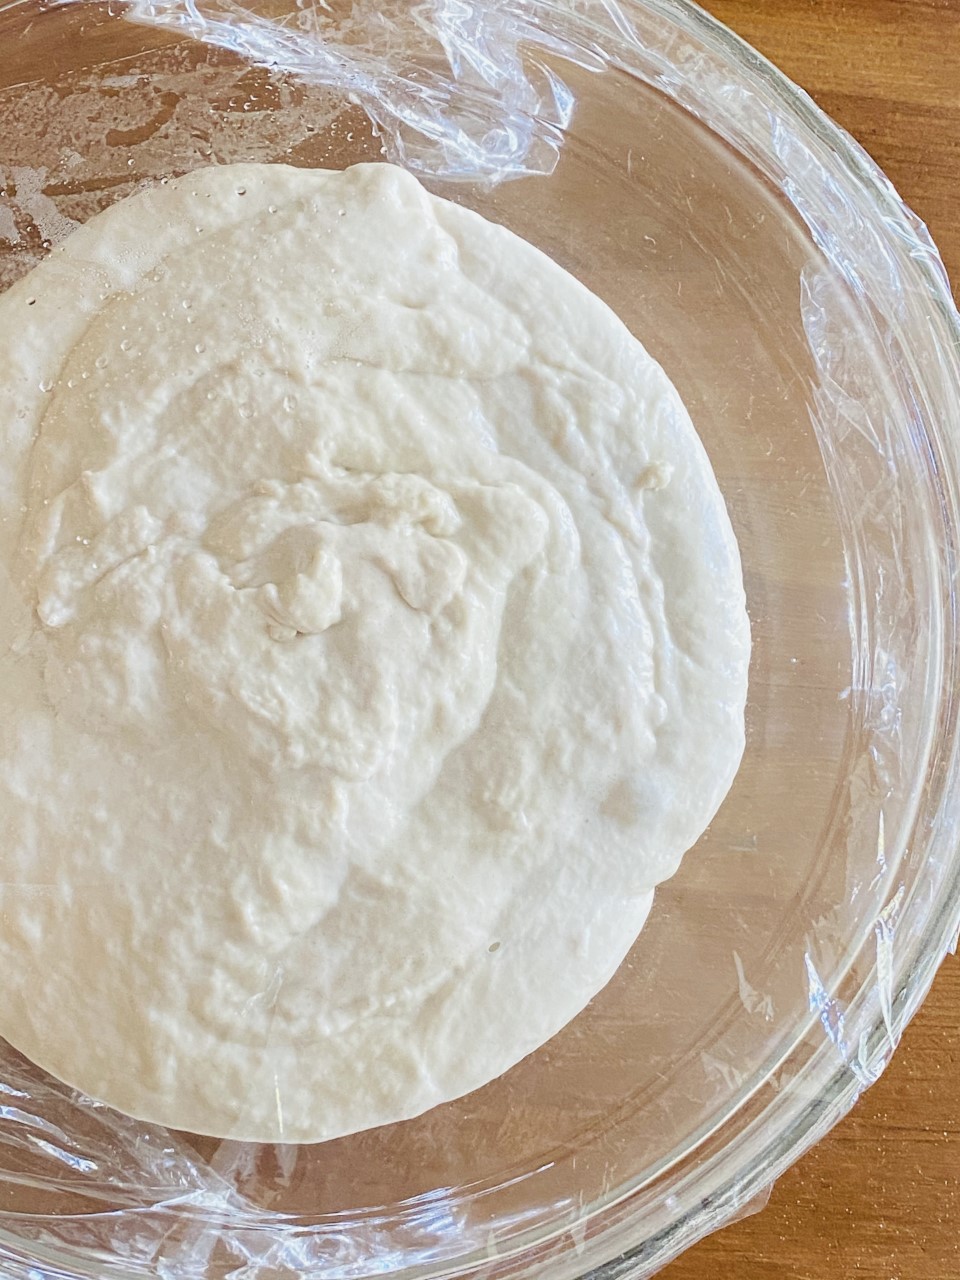
Ciabatta dough resting in a large glass mixing bowl
#4 - First Fold & Rise (50 minutes)
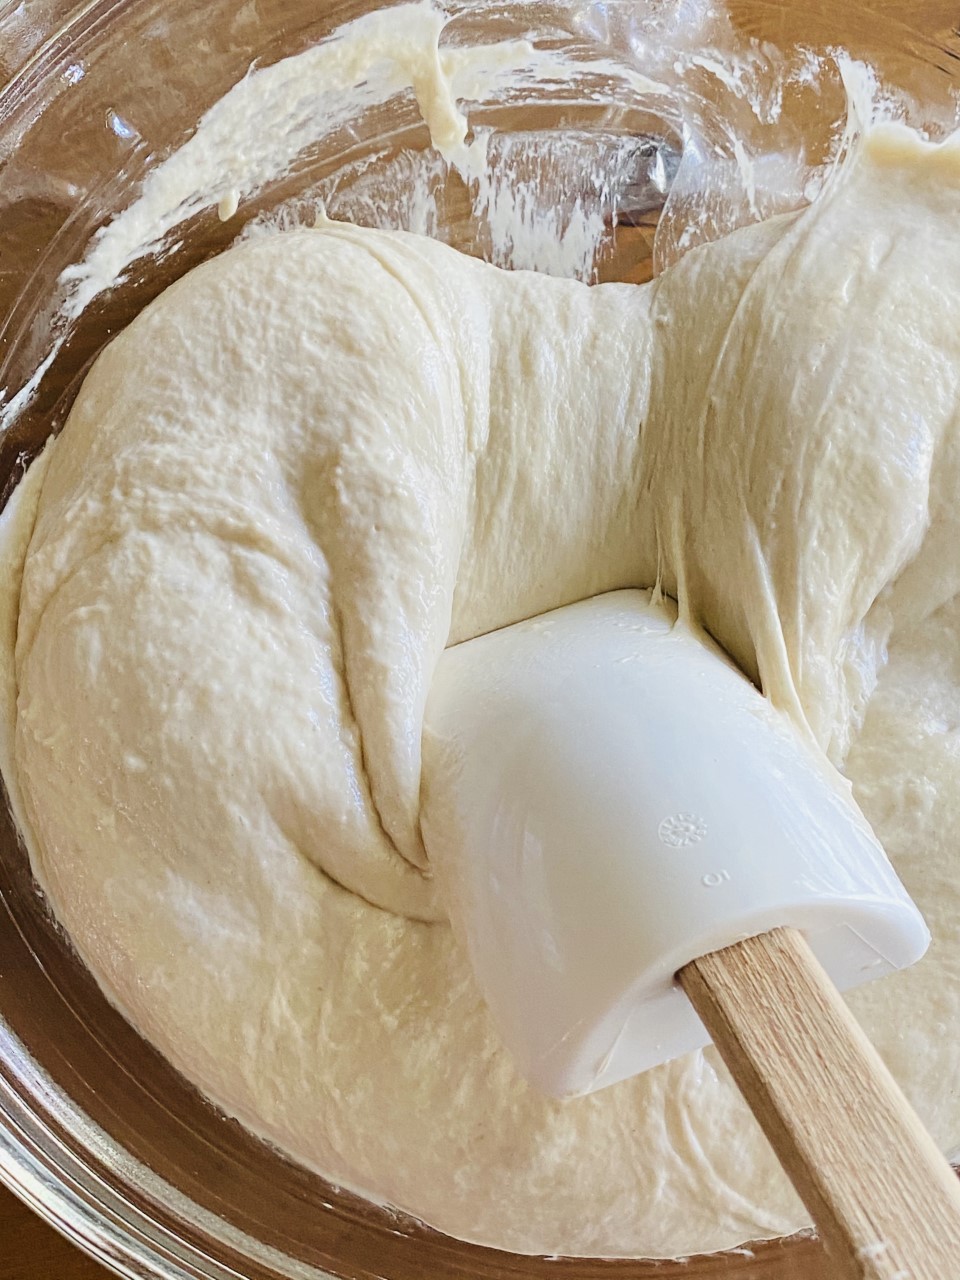
Fold & rotate the Ciabatta dough
#5 - Second Fold & Rise (50 minutes)
Repeat the same as in step #4. Peel the plastic wrap back to expose the dough. Spray a rubber spatula with non-stick cooking spray. Starting from the edge of the bowl, using the spatula gently pull a ¼ section of the dough while lifting it towards the middle and fold the dough over itself.
Rotate the bowl 90 degrees, and fold again. Rotate the bowl and fold the dough 6 more times (for a total of 8 folds and a full rotation of the bowl 2 times).
Put the plastic wrap back on and let rise for 45 minutes again. AT THIS POINT PREHEAT THE OVEN DURING THE FINAL RISE STAGE!
Before baking, place a baking stone on the middle rack of your oven. Preheat the oven to 450°. You want the stone and oven to be hot and ready for the dough.
How to Tell if the Dough is Ready
It is often hard for any new to bread baking to figure out if the dough has risen correctly. My tip for beginners is the "finger poke test". Gently poke the top of the dough with your pinkie finger.
- If it springs back right away, it needs more time & hasn't been proofed enough.
- If it leaves an indention that does not spring back and stays indented or collapses, the ciabatta is over-proofed. Overproofed dough may be dense & not expand & rise as it bakes.
- If it leaves a small indentation that slowly springs back, you know that it is proofed and just right!
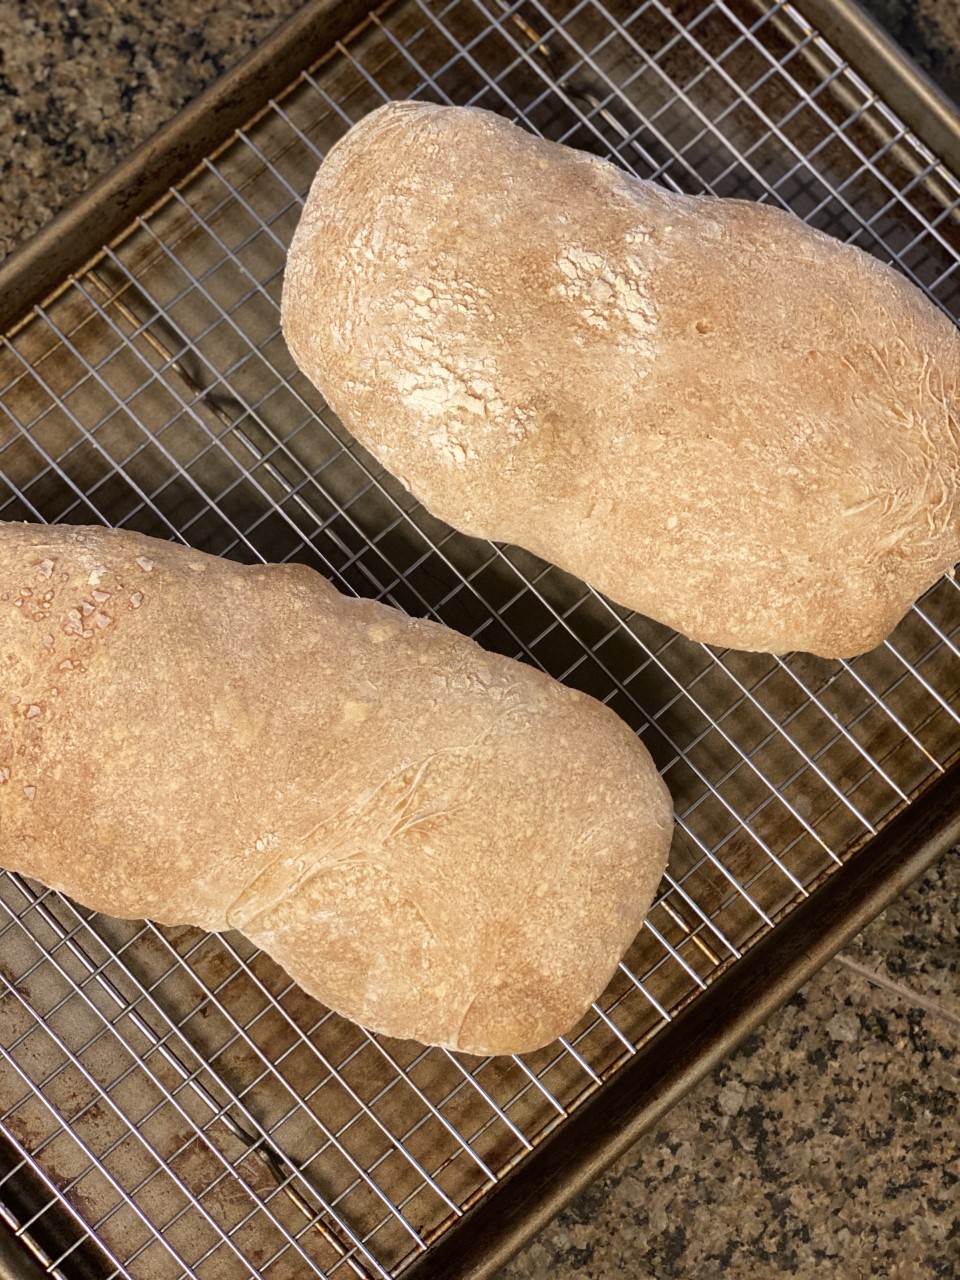
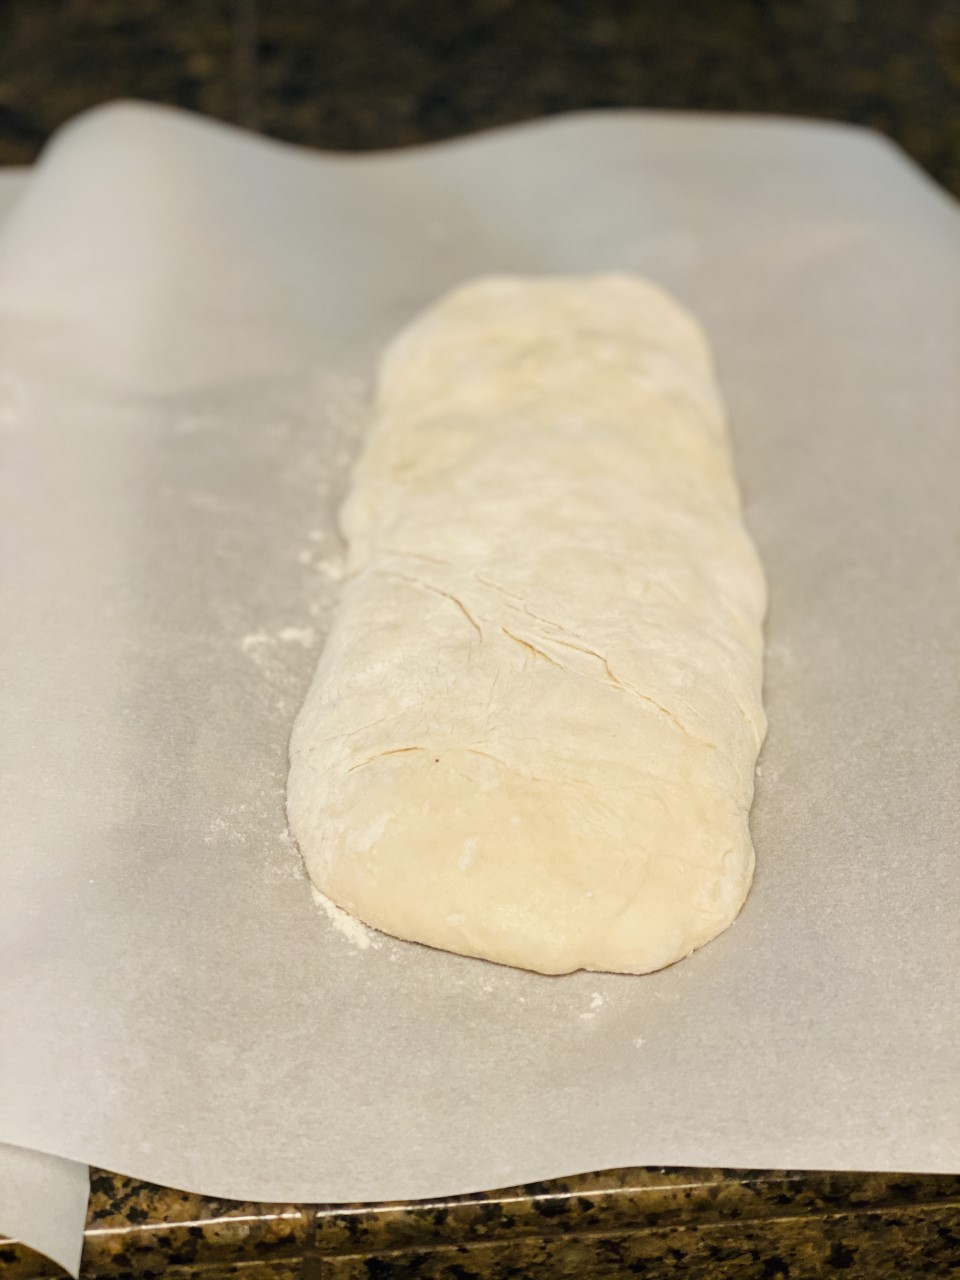
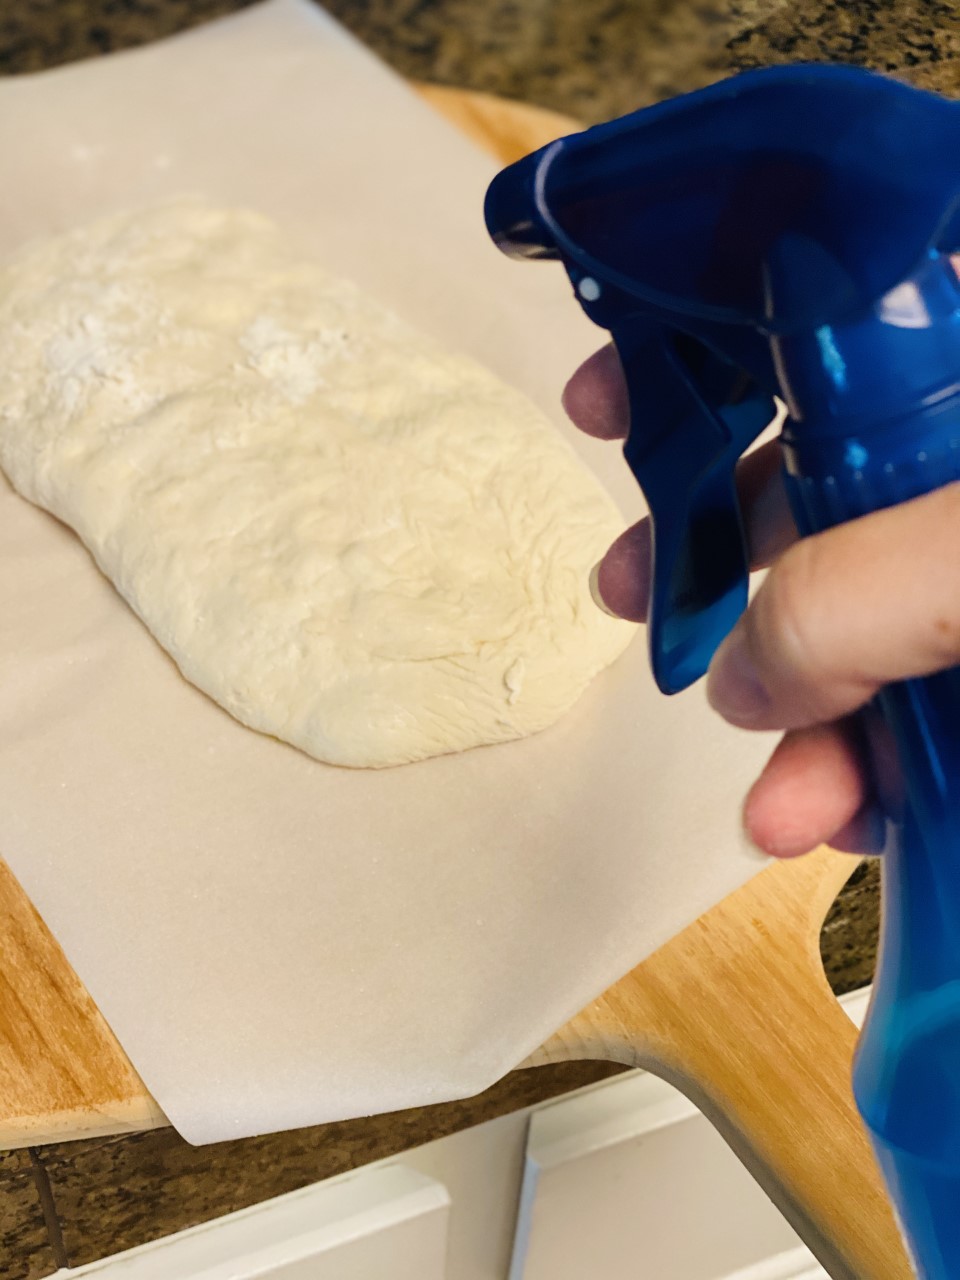
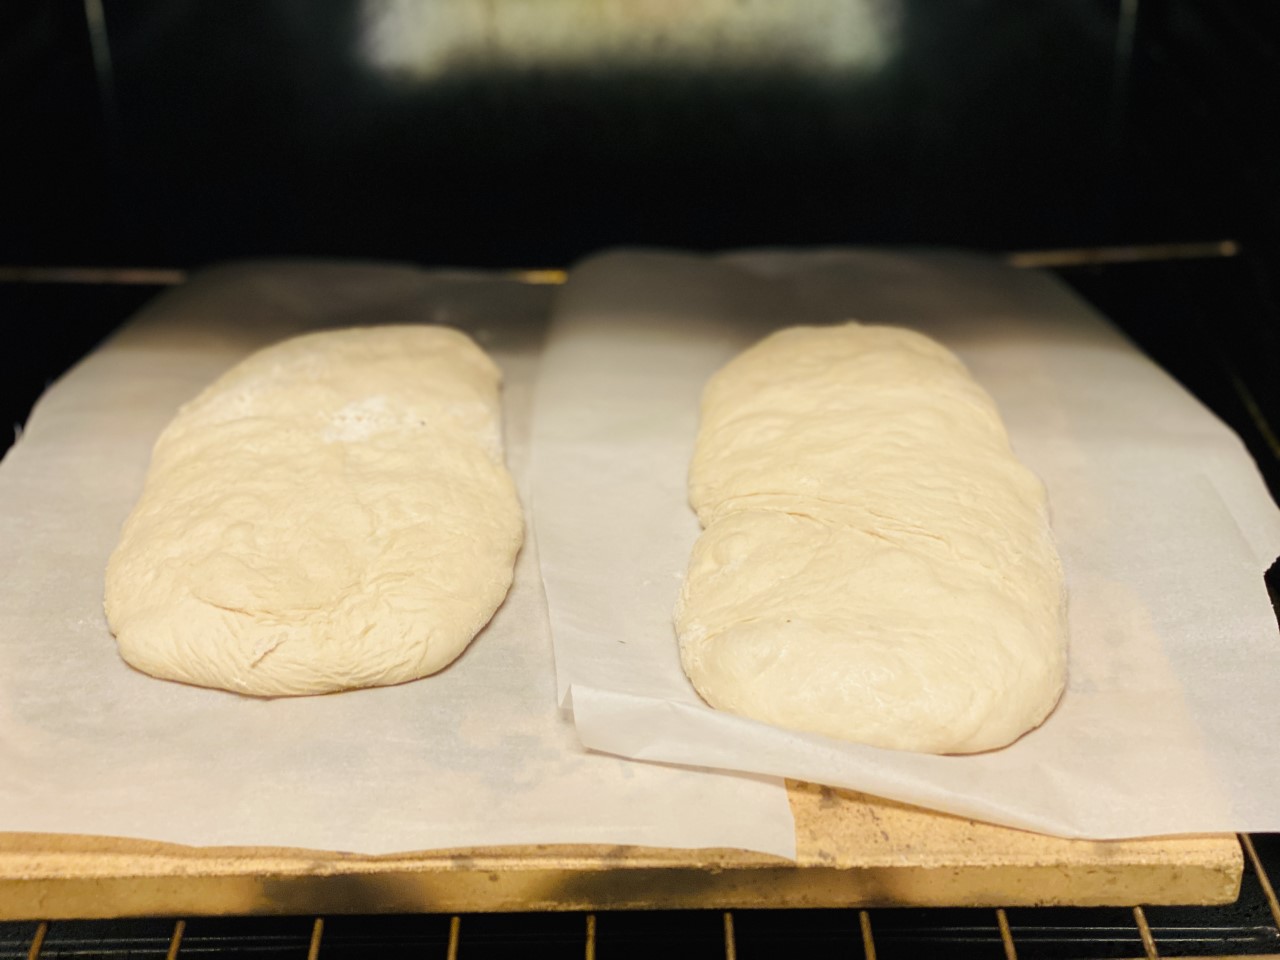
#6 - Shape the Ciabatta & Final Rise (45 minutes)
One of my TOP TIPS for this recipe is to use rice flour instead of regular wheat flour for the shaping steps. Rice flour does not have gluten like regular flour. That lack of gluten creates a barrier between the sticky dough & all surfaces, hands, etc.
Ready to shape the loaves
Ciabatta on parchment paper & ready for the final rise
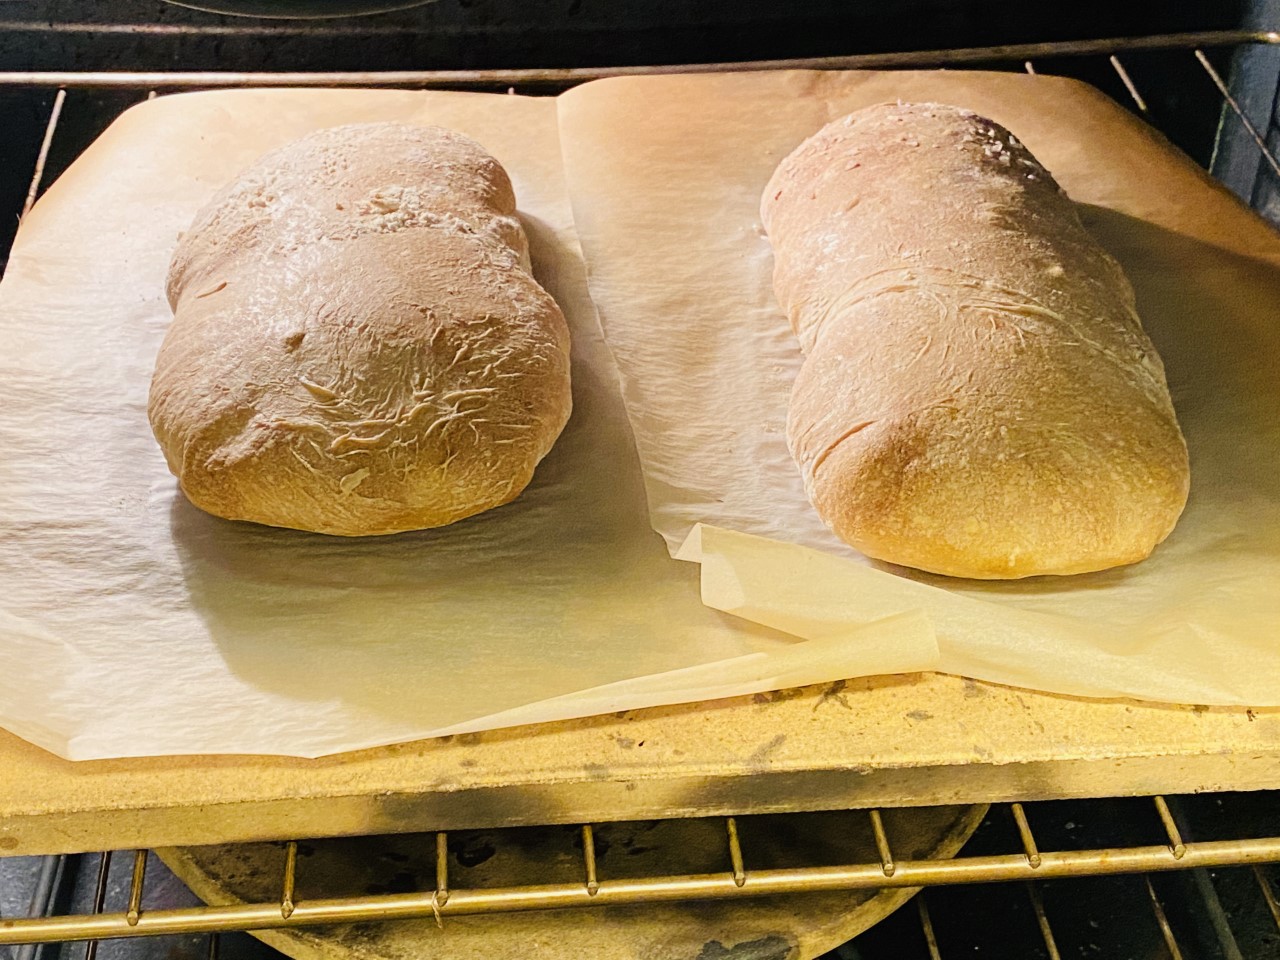
#7 - How to Bake Ciabatta Bread (30 minutes)
Slide each parchment piece and loaf onto a pizza peel. Using floured fingertips, evenly poke the entire surface of each loaf to form a 10x6-inch rectangle shape. Dust off any excess flour, a little is fine but you do not want dry chalky flour clumps that will not be appetizing.
If you wish to add sea salt to the top, now would be the time. I did that here on part of one loaf as a taste test. Ian and I both loved it this way and will be how I make it likely most of the time.
Using a spray bottle, spray the loaves lightly with a mist of water. Slide each loaf and parchment onto the baking stone one at a time after spraying with water.
Bake, and spray the loaves with water two more times during the first 5 minutes of baking time.
Once the crust turns golden brown and has baked for about 25 to 30 minutes, they are ready!
#8 Rest & Enjoy! (30 minutes)
Transfer the loaves to a wire rack, remove the parchment and let cool. You will want to slice and eat it right away but do not be tempted. Let them sit at room temperature for at least 30 minutes before slicing and serving.
This ensures the crust is set and the air pockets are cooled and formed. This creates a lovely balance of the crisp outside and tender airy inside.
Storing Ciabatta Bread
The bread can be wrapped in a brown paper bag rolled tightly closed and stored at room temperature for up to 3 days.

Summary of Steps & Times For Making Ciabatta
TOTAL TIME: 17+ hours
START THE SPONGE AT LEAST 17 HOURS AHEAD OF TIME
START DOUGH AT LEAST 5 HOURS BEFORE YOU WISH TO EAT BREAD
- Make the Sponge (12-24 hour process)
- Make the Dough (15 minutes)
- Knead the Dough & Rest (1 hour & 10 minutes)
- First Fold & Rise (50 minutes)
- Second Fold & Rise & Preheat Oven (50 minutes)
- Shape the Loaves & Final Rise (45 minutes)
- Bake the Loaves! (30 minutes)
- Rest & Enjoy! (30 minutes)
Variations
This recipe makes 2 loaves. Or you can separate the dough into 8-10 hearty rolls instead.
Ciabatta can be plain or have other ingredients folded in at the end of the dough mixing step. Some examples of ingredients to add to your ciabatta that make it even more flavorful and special include:
- kalamata olives
- fresh chopped rosemary
- roasted garlic
- sea salt (which I do here)
- other fresh or dried herbs
What to Serve with Ciabatta
This bread goes great with butter or olive oil & balsamic dipping sauce as an appetizer. I like to dip a slice into my Meat Sauce for Rigatoni to taste test - so Good!
It is also a great side with some Italian favorites like these recipes from this site:
FAQ
Here are some common questions about ciabatta bread. I hope you found what you were looking for. If you still have a question, leave a comment below and I will answer the best I can.
The high-hydration bread seems to work really well in hot Mediterranean climates. Greece, Spain, Portugal, & Italy have similar temperatures, but ciabatta has roots in the Italian bread-making tradition. I am lucky enough to live in California which has a similar climate and ciabatta comes out so well when made and baked here.
This recipe calls for milk. It is not a dairy-free recipe. I do not recommend using milk-free or plant-based milk as an alternative.
This recipe uses commercial yeast and not natural yeast, such as a sourdough starter. You can make ciabatta using sourdough but this is not that recipe.
How to Make Artisan Ciabatta Bread
Ingredients
Sponge Ingredients
- 1 C flour
- ⅛ teaspoon active dry yeast
- ½ C warm water between 105-110°
Dough Ingredients
- 2 C flour
- 2 teaspoon salt
- ½ teaspoon active dry yeast
- ¾ C warm water between 105-110°
- ¼ C whole milk
Instructions
- Make the Sponge – Combine the cup of flour, ⅛ teaspoon of active dry yeast, and ½ cup of warm water (for a correct yeast activation ensure the water is between 105-110°) in a medium bowl. Stir with a large spoon or rounded rubber spatula until it all comes together. Do not over mix. Cover the bowl with plastic wrap. Let the sponge work its magic at room temperature for at least 12 hours or up to 24 hours. If your home is cold, cover with a light kitchen towel also.
- Make the Dough – Get out your stand mixer. Scoop out the sponge and put it in the bottom of your stand mixer bowl. Add the remaining ingredients for the dough; 2 cups of flour, 2 teaspoon salt, ½ teaspoon active dry yeast, ¾ cup of warm water (again at 105-110°), and ¼ cup whole milk. Using the paddle attachment, mix on low speed until combined, about 1 minute.
- Mix - Scrape down the side with a rubber spatula as needed to ensure the wet and dry ingredients come together. Increase the speed to medium-low and continue mixing until the dough comes together and forms as one large sticky dough mass and no longer collects along the sides of the bowl. It should take about 4 to 6 minutes and look like the two photos above as it comes together. It is a sticky dough but have patience. It will combine and become one large mass.
- Knead with Mixer - Scrape the dough from the paddle attachment. Change to the dough hook and knead the bread on low speed for 2 minutes. Then turn up to medium speed and knead for 8 minutes. The dough will still be sticky. Remember this is a high hydration dough, that is how it should be. Do NOT be tempted to add more flour.
- Rest & Rise - Scrape dough from the dough hook and place it in a large mixing bowl. You want to make sure the bowl is large enough for the bread to dough in size and still have additional room. Cover tightly with plastic wrap, and let rest at room temperature for 1 hour. The dough will rise and double in size.
- First Fold and Rise – Peel the plastic wrap back to expose the dough. Spray a rubber spatula with non-stick cooking spray. Starting from the edge of the bowl, using the spatula gently pull a ¼ section of the dough while lifting it towards the middle and fold the dough over itself. Rotate the bowl 90 degrees, and fold again. Rotate the bowl and fold the dough 6 more times (for a total of 8 folds and a full rotation of the bowl 2 times). Put the plastic wrap back on and let rest for 45 minutes. It will rise to about double in size again.
- Second Fold and Rise – Repeat the same as in the above step. Peel the plastic wrap back to expose the dough. Spray a rubber spatula with non-stick cooking spray. Starting from the edge of the bowl, using the spatula gently pull a ¼ section of the dough while lifting it towards the middle and fold the dough over itself. Rotate the bowl 90 degrees, and fold again. Rotate the bowl and fold the dough 6 more times (for a total of 8 folds and a full rotation of the bowl 2 times). Put the plastic wrap back on and let rise for 45 minutes again.
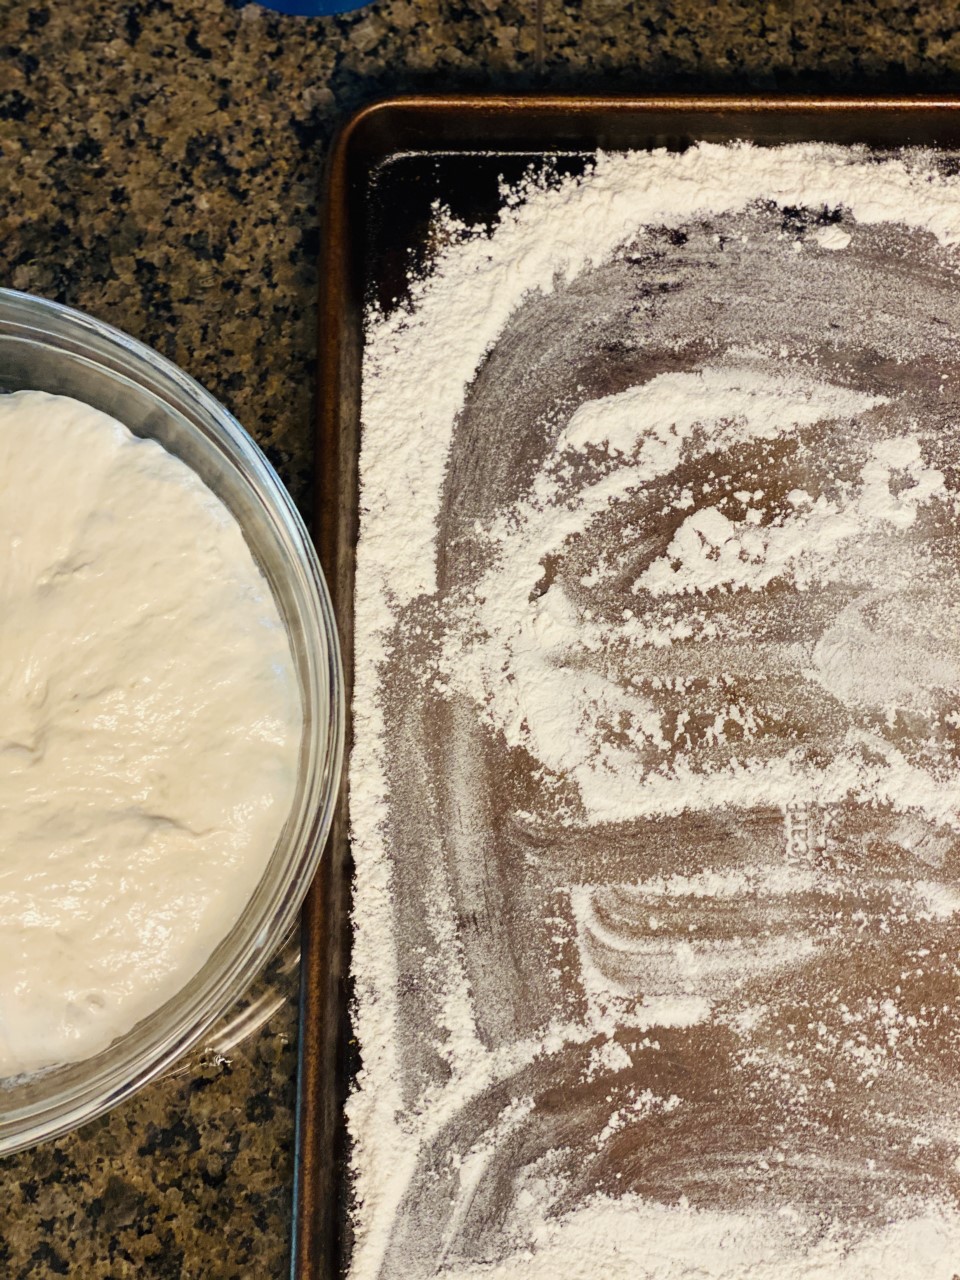
- Shape Loaves and Final Rise – carefully transfer the dough to a floured work surface. I use a baking sheet since it is rimmed and contains all that flour for less of a mess. Dust the top of the dough with a good amount of flour and divide it into equal halves. With well-floured hands, shape the dough into about a 12×8-inch rectangle. Do not press down or work too much, you do not want to deflate the dough (you want those bubbles to form later as it cooks). Lastly, fold the short sides of the dough toward center, overlapping them like you would fold a letter in thirds, to form an 4×8-inch rectangle. Repeat with the other half of the dough. They do not need to be perfectly sized, again these are rustic but near that size will help the timing baked properly.
- Rest Loaves & PREHEAT- Cut two 12×6-inch pieces of parchment paper and dust lightly with flour. Gently transfer each loaf, seam-to the parchment sheets, and place seam-side down. Dust the tops with very little flour, and cover loosely with plastic wrap. Let the loaves sit at room temperature for 30 minutes. The loaves will expand further and have tiny bubbles develop on the top during this final rest. AT THIS POINT PREHEAT THE OVEN TO 450° DURING THE FINAL RISE STAGE!
- Prep the Loaves – Slide each parchment piece and loaf onto a pizza peel. Using floured fingertips, evenly poke the entire surface of each loaf to form a 10×6-inch rectangle shape. Dust off any excess flour, a little is fine but you do not want dry chalky flour clumps that will not be appetizing. If you wish to add sea salt to the top, now would be the time.
- Spray & Bake - Using a spray bottle, spray the loaves lightly with a mist of water. Slide each loaf and parchment onto the baking stone one at a time after spraying with water. Bake the loaves at 450° and continue spraying the loaves with water two more times more during the first 5 minutes of baking time. Once the crust turns golden brown and has baked for about 25 to 30 minutes, they are ready!
- Cool and Eat – Transfer the loaves to a wire rack, remove the parchment, and let cool. You will want to slice and eat it right away but do not be tempted. Let them sit at room temperature for at least 30 minutes before slicing and serving. This ensures the crust is set and the air pockets are cooled and formed. This creates the lovely balance of the crisp outside and tender airy inside.
- The bread can be wrapped in a brown paper bag rolled tightly closed and stored at room temperature for up to 3 days.
More Bread & Roll Recipes
Here are similar recipes for fresh baked breads:
Karie says
Nothing like a fresh-baked bread. I might need to try this with my beans tonight. 🙂
Angela says
Great, I hope you love it.
Danielle Ardizzone says
Looks delicious!
Beth Shields says
Wow this looks great. I love a bread with a good tooth to it, as they say. I can smell it rising, baking and then of course being eaten. Thanks for the recipe. Will have to give it a try. Then find me a good bottle of red wine and some goat cheese - I will be set!
Angela says
Oh now that sounds delish.
Debbie says
I love bread with butter or with seasoned olive oil! Looks delish!
Tricia Snow says
I love this recipe! I love ciabatta with my tomato soup! Yummy!
Angela says
Thanks Tricia, we are ciabatta and soup fans here too.
Cathy says
It looks delicious and I do love ciabatta bread. I'm not sure it looks easy to me? I don't have that attachment for my mixer.
I'm sure it's delicious!
Angela says
The steps are easy, there are just many. Maybe share the recipe with friends and they can bake for you!
Eva Keller says
Looks like a fun bread to make and bake! I love ciabatta bread, but I don't think I've ever made my own bread outside of home ec classes in high school. Now that I'm home more I've been enjoying more cooking and baking. I'll have to try making bread some time.
Angela says
Yes, home ec for the HOME is great at this time. I have my kids in the kitchen more and helping too. Time for us all to learn and get brave in the kitchen.
Linda Egeler says
Have never baked a bread that involves "a Sponge," but with these stay-at-j=home orders now may be the time where I actually do have time to try it!
Angela says
Oh yes, now is a perfect time. I hope you give it a try!
Holly says
Great recipe! I added it to my Yum recipe box.. can't wait to try it!
Angela says
Great thanks Holly!
Diane Kurzava says
Must. Make. This! I love homemade bread and I can almost taste it dipped in olive oil and then spices! Yummm.
Angela says
Exactly, so delish!
Tiffany says
Thanks for the time breakdown - that is always the hardest part for me to manage!
Angela says
Me too, I end up with post-its keeping track and counting backward so I can make sure the bread is ready for dinner not dessert, haha! I am glad it helped.
Hillari says
Ooh - I have never thought about making my own ciabatta bread! This is great!
Angela says
Oh you will love it, give it a try.
Lisa Manderino says
This looks amazing! I love homemade bread!
Angela says
Thank you.
Barbara says
That looks so good! I can smell it baking!!
Angela says
Haha, yes!
Jen says
I've been making sourdough bread for a year or so. I may have to give this a try to add to my breadmaking repertoire!
Angela says
Great, glad to know you are making bread too. I am attempting my second sourdough tomorrow actually. Hoping it is another good one.
Sandi says
So much work, but so worth it. Great recipie.
Angela says
Thanks so much, I agree.
Joanne says
We've been having fun trying out all sorts of different bread dough recipes and we have yet to try a ciabatta! Pinning this one to try; thanks for the step by step photos too.
Angela says
Great, thanks for pinning and I hope you enjoy it.
Charlene says
As soon as I can find yeast... I have several homemade bread recipes waiting for me!
Angela says
Oh no, I have been lucky on Amazon.
Santana says
I'll be sure to try this! I usually only make white and potato bread, but I need to branch out more.
Angela says
Have fun trying something new and delicious.
Tonya | the Writer Mom says
I've never made ciabatta bread, but it looks delicious, and I bet my husband would love it too!
Kendra says
I'll have to try this with Gluten free flour. Ciabatta is my fave!
Angela says
I would love to hear how that turns out Kendra.
Helen at the Lazy Gastronome says
I love baking bread. And I like to do it all by hand. A gratifying activity for sure! Thanks for sharing at the What's for Dinner party - have an awesome week!
Angela says
Great to hear, cooking can be very therapeutic and kneading my hand sure is one of those times.
Julie says
We have been baking a lot of bread in the last two months, I haven't tried a ciabatta, Thanks for the recipe!
Angela says
You are welcome.
Alice says
Thanks for sharing. I learned a lot from your post.
Debbie Moore says
Thanks for sharing. Plan to make it soon!
Angela says
I hope you enjoy it.
Cindy says
These look amazing! I love bread...or used to. I'm vegan AND gluten free. I discovered several years ago I have a gluten sensitivity. I can imagine how wonderful these taste with olive oil.
Melissa Jones says
Those look great and the recipe looks user-friendly!
Angela says
Thank you and I hope you try making rustic ciabatta, it is so fun and no pressure on what it looks like.
Bob Stella says
All Purpose or Bread flour?????
Angela says
Good question, I used AP Flour.
Dee | Grammy's Grid says
Looks tasty! Thanks so much for linking up with me at my #UnlimitedMonthlyLinkParty 12, open May 1 to 26. All party entries shared if social media buttons installed.
Miz Helen says
Your Ciabattta Bread looks amazing! Hope you are having a great week and thanks so much for sharing your awesome post with us at Full Plate Thursday,483.
Come back soon!
Miz Helen
Ruth Iaela-Pukahi says
Would you know if the only difference between Ciabatta bread and French bread is just the shape of it?
Angela says
They are similar in that the recipe includes the same method and ingredients. The difference is ciabatta dough is just has a tad bit of a higher hydration (wetter) than French bread.
Rochelle says
I Love Ciabatta Bread! Can't wait to make this recipe. Your instructions are really clear 🙂
Angela says
Bread making is not easy especially for newbies so I tried to be very specific to help everyone out. Thanks for checking out the recipe and leaving a comment.
Michelle says
I will have to remember to make this on the weekend or at least start it on Friday night. I didn't realize making ciabatta bread was such a long process but well worth it.
Angela says
It is several steps to make Ciabatta but it is not difficult. Just plan ahead and you will be SOO happy to have warm fresh ciabatta bread from your oven.
Beth says
I love how thorough you are about how much time in advance to start each step. I love slow processes like this and can really see myself enjoying it. In your research, did you come across any mention of making this with a gluten-free flour?
Angela says
Great question Beth. I have not tried it yet but I do plan to give it a go sometime soon as I was just able to find once again the 1:1 gluten-free mix that I like to use. Being resourceful during some empty grocery shelves has been interesting.
Travel Clans says
nothing is better than freshly baked bread! hmmmm
Angela says
Absolutely try - the smell of fresh-baked bread is enticing enough but once you have a slice even if a bit warm - wow!
Jacqueline Debono says
Living in Italy means we eat a lot of ciabatta but to be honest I've never made it myself. Feeling inspired to try your recipe. Yours looks beautiful!
Angela says
Ok now I am a bit nervous - this recipe is amazing and we love it - A LOT! If you give it a try, would love to hear the comparison to true Italian ciabatta bread from your area bakeries.
Nart at Cooking with Nart says
Love this type of bread but have never made it by myself because I'm always too scared it won't turn out right. Your instructions here are very detailed and this gives me hope!
Angela says
I hope that the hope you find with this recipe results in you giving it a try!
Kevin says
this a great example of the recipe, I found when I was trying this it came out so dense but now with a few of these tricks it has come out fluffy.
Genevieve says
Saving this to make this weekend! Love the thorough tutorial!
Angela says
Glad the long post is beneficial and all the steps should bring you success.
Kevin says
I have made this twice now and came out great both times. Next time I want to make rolls. How many rolls if you wanted them for sandwiches would this make?
Angela says
Hi Kevin - glad you love this ciabatta recipe. For rolls, the dough can be separated into 10 equal parts for rolls. Shape them into traditionally square-like shapes that ciabatta rolls tend to be in.
Jennifer Forward says
I'm ready for soup and bread season!
Angela says
This ciabatta bread recipe goes so well with soups, you will homemade bread for this for sure.
Heather Brown says
oh I can smell my house now! I can't wait to try this! Thanks Ang!!
Robin Black says
Can’t wait to try this recipe it looks delicious
Caroline Parrott says
OMG this bread looks amazing, maybe even "gluten-worthy" for me personally. It does look time consuming, so maybe a long rainy winter's day project. Certainly looks like it would be worth the effort. Pass the butter too.
Nisha says
Wonderful to see the Ciabatta making process here , We love this bread at home .Hope to try it some day!
Brandi says
Followed this step by step and it took a long time but was not hard to do. The bread turned out perfect and was so good with soup for dinner. Ciabatta is my favorite at italian restaurants and now I can have it at home. Thank you for taking the time to write up every step. Anyone can now make this.
Angela says
As Fall arrives I keep craving soup and this ciabatta bread is a great side dish for that. I am happy to hear this was a successful recipe for you.
Tina says
This was so good. Yes really good. We miss going out to our favorite restaurant that has ciabatta with a garlic dipping sauce. I was slow making this to be sure I followed it exactly and it turned out just like what we have been craving. It does take a long time so glad I planned ahead.
Angela says
I am glad you took the time to make homemade ciabatta as it sounds like this was just the recipe you were looking for. Thank you so much for the compliment that this recipe was like your favorite restaurant's ciabatta bread.
Fran Leitch says
Good day!
The recipe sounds wonderful!!
Do you happen to have a version that does not call for a stand mixer? I do not have one and I am not looking to buy one.
Thank you
Angela says
Unfortunately I do not have a version without the stand mixer. The dough hook is important with many bread making recipes including this one because it is a very "wet/hydrated" dough.